

Home > Websites > E-commerce > Products

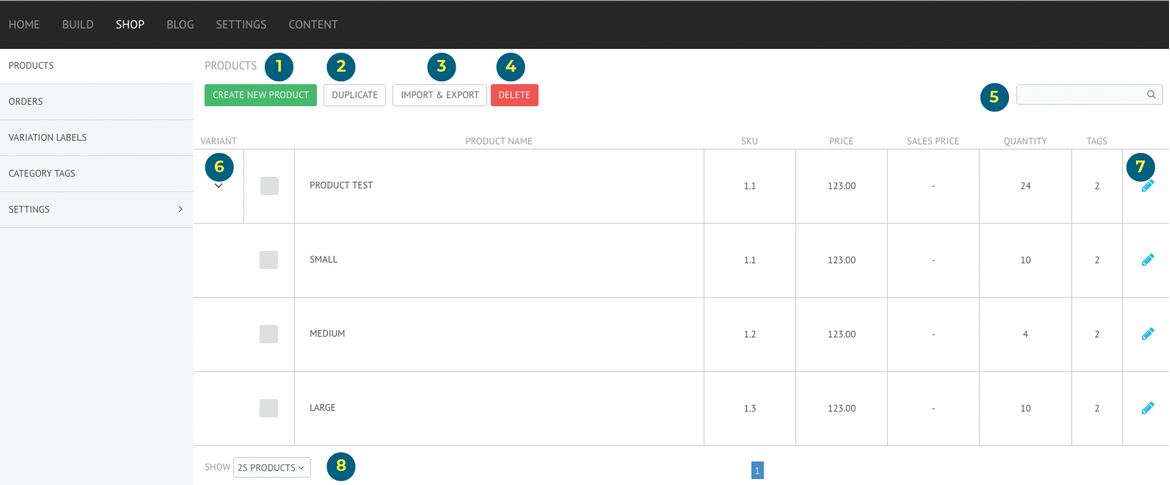


SEARCH
You can search your whole inventory based on the complete or partial product name, instead of having to manually look for the product.

DUPLICATE PRODUCT
Instead of always creating new products, the editor also offers you the possibility to duplicate existing products. Simply select the product(s) you wish to duplicate by clicking on the square on the left of the product, followed by clicking on Duplicate.
Please note that when you duplicate a product, by default the copy will be hidden - which means it won't be shown on your product catalog


SHOW VARIANTS
By default, your inventory will only show your main products. To have an overview of the product and its variants, you must click on the small arrow icon.
EDIT PRODUCT
You can edit any product at any given time. Click on the editing icon on the right side of the product and you'll be redirected to the product options where you can change basic information, variants, images and SEO.


IMPORT & EXPORT PRODUCTS
You will be able to import and export your product list as a XLSX file.
DELETE PRODUCT
To delete one or more products, select the one(s) you wish to delete by clicking on the square on the left of the product followed by pressing the Delete button.

SHOW
You can choose the number of products you wish to be shown on each page.
HOW TO ADD A NEW PRODUCT
Click on Build > Shop > Products > Create New Product
Once you have done that, a new page with four different tabs appears.
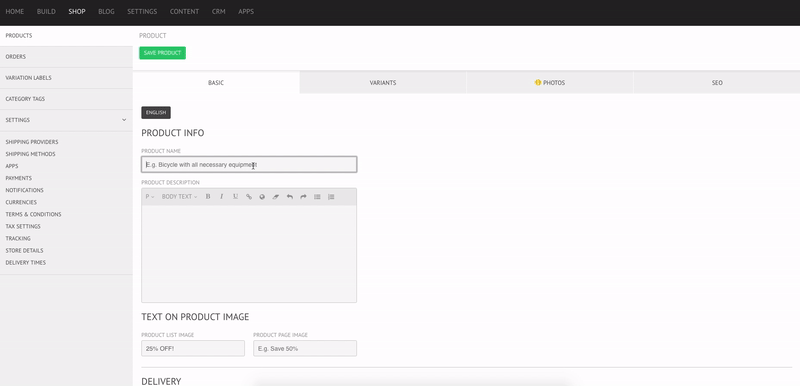


BASIC INFORMATION TAB
Click on Build > Shop > Products > Create New Product > Basic
When creating or editing a product, the first tab is the Basic Information.
Please note that you have to fill the information for each language that your website supports. Select the language on the top of the Products page.
PRODUCT INFO
In this section you want to add the product name and a brief description with the most relevant information on it.
TEXT ON PRODUCT IMAGE
This feature is perfect for when you are having a sale or wish to communicate something brief about a specific product by adding a text on the product’s image. You can add the text in the boxes and choose whether you want to have it show only on the product list (catalog), on the product page image or on both.
PRICE
You can set the different prices for each currency that your shop supports and also special sale prices. If you want to have a sale price on the product while running a campaign, simply define when do you want it to start and end.
Please note that the prices can be added excluding or including tax and the system will automatically calculate the accurate price. The price will be calculated based on the tax regulation of the country you have entered as your store location and on the type of good (Physical, Digital or Event). If you have manually defined a specific tax rate this will figure as the tax rate.
TAX
Different tax rates apply depending on the type of product. The editor calculates the rates automatically if you define the kind of product you are selling. You can choose between physical goods, digital goods or events.
VISIBILITY
This feature allows you to define the visibility of your product. This means whether the product will be shown on the catalogue to your clients or not. You can hide it or make it visible from a specific date.
TAGS
Here you can add as many tags you wish relevant to your product. The tags are extremely useful to organise and display your products on the catalogue.
You can have an overview of your existing tags or create new ones on the Category Tags section.
VARIATION LABELS
You can define what variation labels to add to your product by selecting from existing Variation Labels created by the designer. You can also add as many variation labels as you want.
VIDEO HTML
In case you wish to display a video in the Products Page, you can add its embed code in this section. The video will show up underneath the product description in the Products Page.
DOWNLOAD
It is possible to attach a file that your visitors can download directly from the products page. The download button will appear underneath the video in the products page.
MULTIPLE LANGUAGES
If you have added multiple languages on your website you need to input a product title, a product description and a price for each of your languages. In the Settings tab on your Shop page you can choose which primary currency you want to have each of your languages associate with. If you remove a language from your site keep in mind that this will also delete that language from the product creation page and any information you may have entered for existing products in that language.

VARIANTS TAB
Click on Build > Shop > Products > Create New Product > Variants
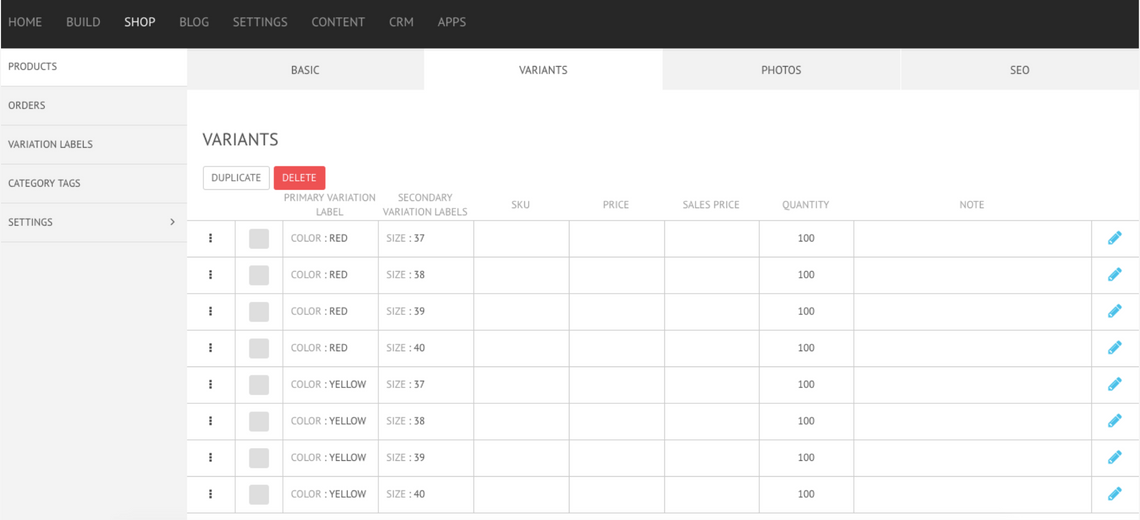
ADD NEW VARIANT
Click on the Grey Tick Box on the left side > Duplicate Button > Click on the Edit tool (Blue Pencil) On the right side > Edit Product Details
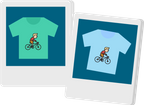
PHOTO TAB
Click on Build > Shop > Products > Create New Product > Photos
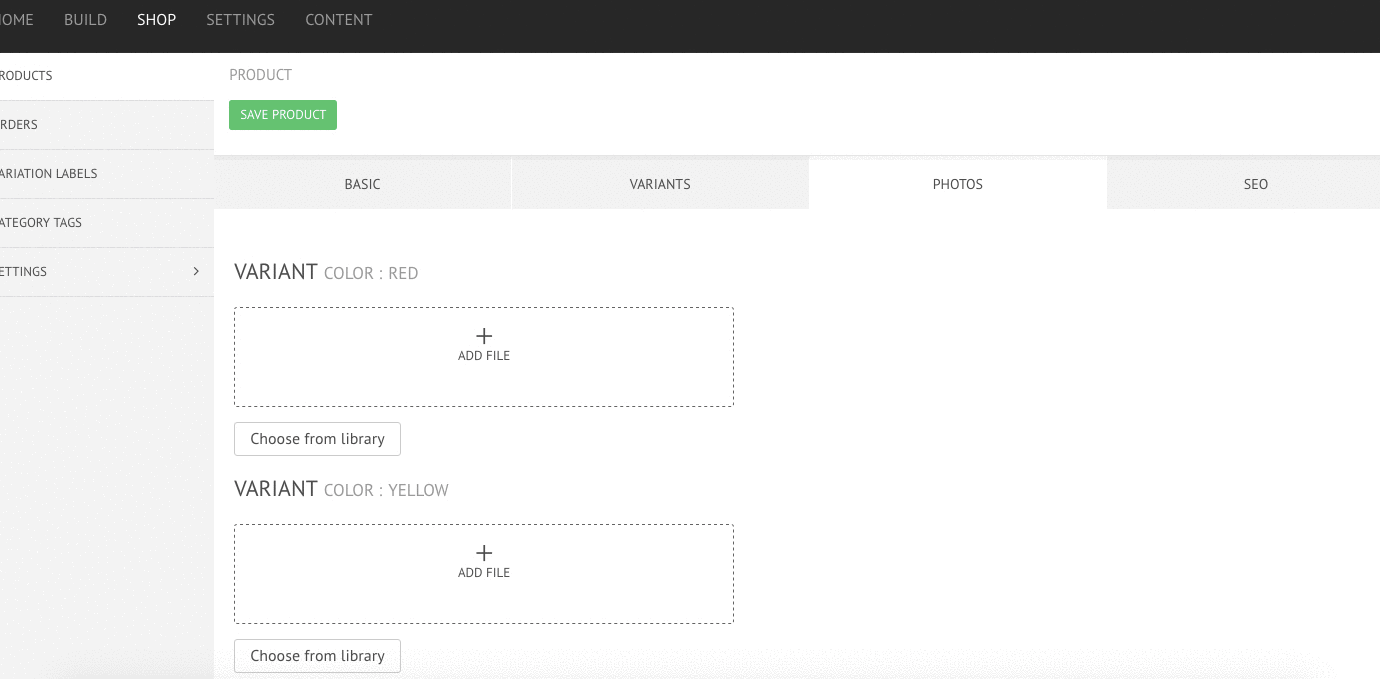
ADDING IMAGES TO DIFFERENT VARIANTS
You can add a photo to each variant of your product based on the Primary Variation Label.
ADDING THE SAME IMAGE TO DIFFERENT VARIANTS
By default when having different variants you will have to attach images to each variant. If you want to use the same image for all variants there is an easier way to do so. All you must do is to add your variant as the secondary variation label and leave the primary variation blank. In this case you will be able to add the same group of images to all variants.
When uploading your product pictures, you should keep the same ratio so they will appear in the same way in the catalogue; creating a more consistent look. However, if you choose to upload different sized pictures you can then choose to adjust the size of the product thumbnails in the catalogue. The editor gives you this flexibility to create the look and feel as you most prefer.

SEO TAB
Click on Build > Shop > Products > Create New Product > SEO
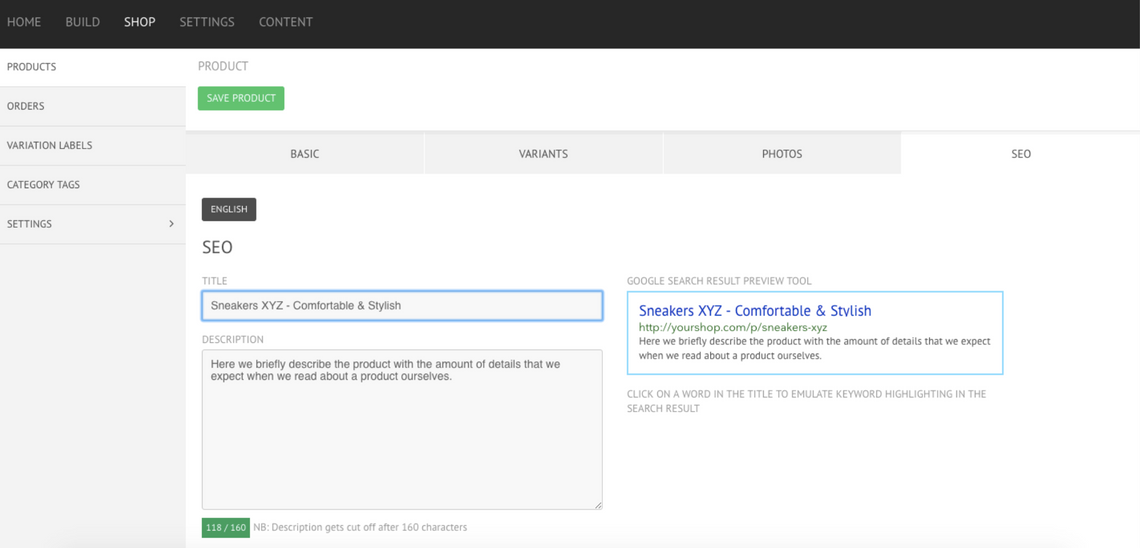
TITLE
Here you should add your product’s name.
DESCRIPTION
Add an interesting, brief and relevant description of your product. Try to keep it under 160 characters and don’t forget to include keywords that potential customers might look for if they would want to get your product.
KEYWORDS
Add the relevant keywords in relation to your product in this section.
PERMALINK
Create your own permalink for each individual product or let the editor generate it by itself. Note that, in order that each products page has its own SEO value, each page must have an individual permalink, different from other existing products.
PREVIEW
As you’re filling in the fields, you’ll be able to preview what your product would look like on a Google search through the Google Search Result Preview Tool. Here you can also click on a word in the title to emulate keyword highlighting in the search result.
301 REDIRECTS
If you already had E-commerce products on your website and wish to maintain their SEO value, it is possible to redirect the individual products to their new pages.
Simply type down in the field only the directory part of the URL (e.g. ProductX instead of www.yourdomain.com/ProductX).
Don’t forget to save your progress by clicking on the Save Product button on the top of the page. We also recommend you to check our practical example to fully master the product creation process on the editor.