

CRM
Get to know your clients!
CRM allows you to access and manage your business relationships, data and information for different sales and marketing processes.


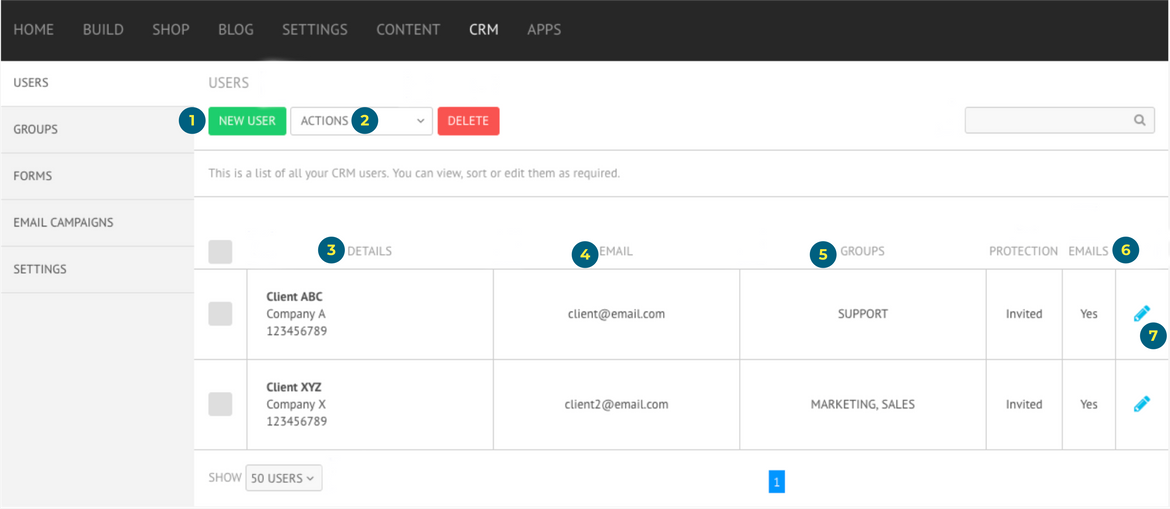


GROUPS
This section displays the group(s) the user has been added to.

ACTIONS
This field should be used to apply specific actions to a user, like approving/rejecting/ managing groups.

SUBSCRIPTION EMAILS
This section displays whether a user is included in the email campaigns list or not.


DETAILS
This section displays a user's first and last name, company and phone number.
EMAILS
This section displays a user's email address.

EDIT
To view more details about a user simply click on the small pencil icon. Alternatively, you can click directly on the user name to open the user card. This is another way to edit information on a user. Whenever you have done any changes, don't forget to select Save User on top.
Please note that even though visible, some features won't be usable depending on your subscription plan.

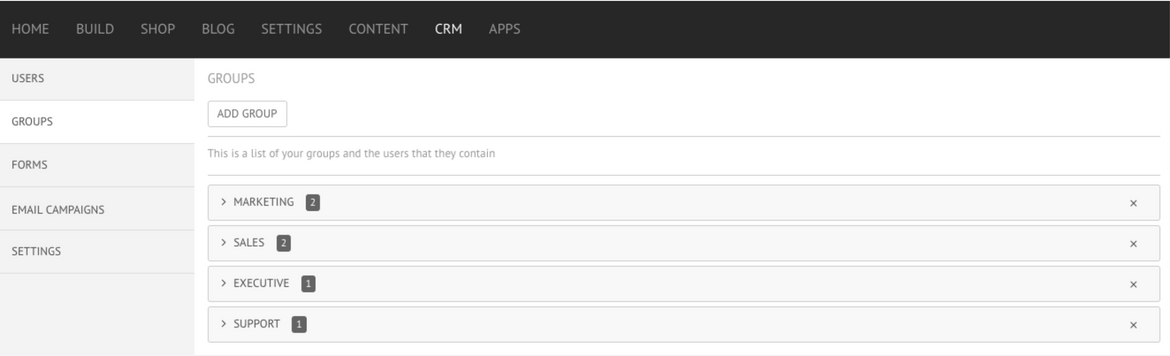
WHAT IS A GROUP?
You might find yourself struggling to define different groups. The idea is that you should create groups in which your users share similarities. Think that the use of groups is to define groups of people that have access to the same pages or receive the same newsletter. Frequently used groups include job titles, departments, responsibility level, etc. Be creative and add groups that are useful to your business.
ADD GROUP
Click Add Group button > Give a name to the new group > OK
DELETE GROUP
Click on the Close (X) on the right-side of the group > Click OK

FORMS TAB
Click on Build > CRM > Forms
In this section it is possible to store and manage data you have collected from forms.
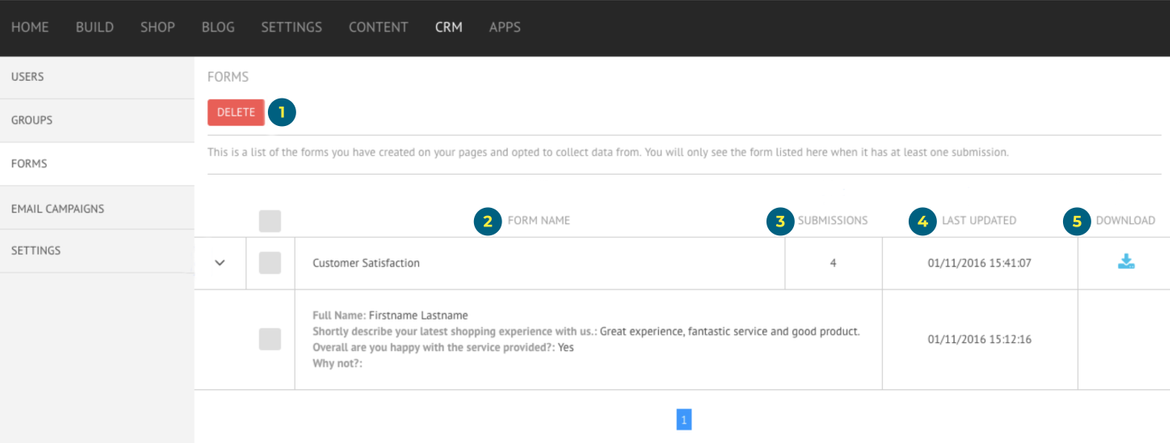

DELETE FORM OR FORM DATA
Click on the small grey tick box on the left side of the form name or the answer > Click on the Delete button.

LAST UPDATED
Overall this field displays the date and time of the last answer submitted.

FORMS NAME
This field displays the name of the data collection.

DOWNLOAD
This field allows you to download your form questions and answers as an .XLSX file.
SUBMISSIONS
This field displays the number of submissions for each form. This means the number of respondents who have completed and submitted their answers.

EMAIL CAMPAIGNS TAB
You can easily create, test, send and delete email campaigns.
Click on Build > CRM > Email Campaigns


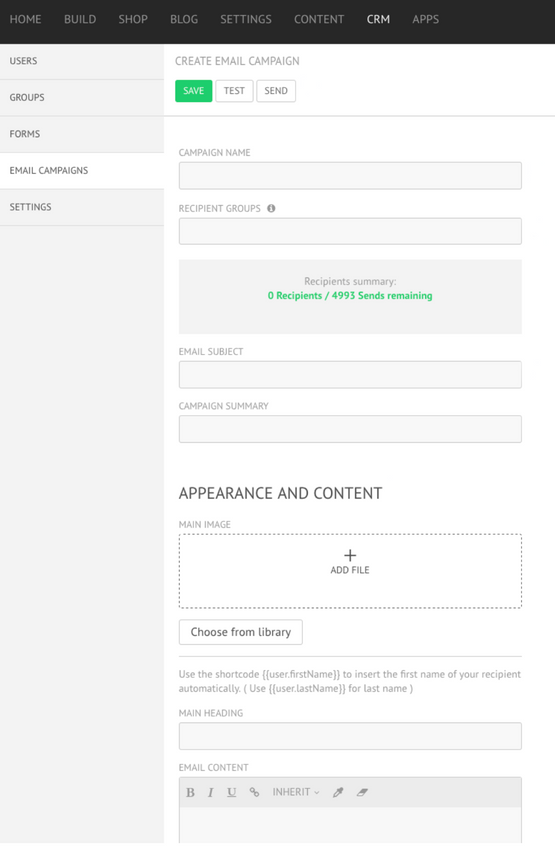
CREATE NEWSLETTER
Click on Create Email Campaign button.
TEST: If you want to test your campaign, all you must do is press Test and insert the email to which you want the campaign to be sent to.
SEND: Pressing Send will send your campaign to all the recipients.
This action cannot be undone, so only press the button when you are sure you want to send the campaign.
RECIPIENT GROUPS: In this field you can define the user groups that will receive that newsletter. Please note that the number of emails you can send per month are defined depending on your subscription plan.
APPEARANCE AND CONTENT:
MAIN IMAGE
Click on Add File or Choose from Library
CONTENT
In the following fields is where you would write the actual content of your campaign, including the main heading and the body.


DELETE NEWSLETTER
Click on the small grey tick box on the left side of the newsletter > Click on the Delete button.
CAMPAIGN NAME
The details include the campaign name and summary.
RECIPIENTS
This field displays the number of recipients for the campaign.
ACTION DATE
Date/Time of the last action done on the campaign.
DETAILS
This field will only display data once the campaign has been sent. If your newsletter has been sent, you will be able to see two important statistics:
OPENS
The OPENS percentage shows how many of your recipients actually opened a successfully delivered email campaign.
CLICKS
The CLICKS percentage shows how many of your recipients opened a successfully delivered email campaign and actually clicked on any link that you might have provided.


STATUS
This field displays the status of your campaign. The status can either be:
NEW
If the status of your campaign s marks NEW, it means that the campaign has been recently created and it hasn't been sent yet.
SENT
If the status of your campaign s marks SENT, it means that the campaign has already been sent to its recipients.
DUPLICATE NEWSLETTER
Click on Duplicate icon > Duplicate campaign
It is possible to duplicate new and sent campaigns.
EDIT
A campaign can be edited at any point before you have sent it. This means you will find the Edit icon only when the status of your campaign marks NEW.